- Home
- Workday Certification
- Workday-Pro-Integrations Exam
- Workday.Workday-Pro-Integrations.v2025-11-03.q18 Dumps

Question 11
You have been asked to refine a report which outputs one row per worker and is being used in an integration that sends worker data to one of your third-party systems. The integration should only send workers who have been hired in the last 30 days. Where in the custom report definition can you specify a condition that would include only workers who have been hired in the last 30 days?
The requirement here is to restrict the report to workers hired within the last 30 days. In Workday reporting, this can be achieved by adding a filter condition on the "Hire Date" field of the Worker business object.
Specifically, you would configure the filter to compare the "Hire Date" against a dynamic date range, such as
"Current Date minus 30 days" to "Current Date." This ensures the report dynamically adjusts to include only workers hired in the last 30 days each time it runs, which aligns with the needs of an integration sending real- time data to a third-party system.
Here's why the other options are incorrect:
* A. Subfilter: Subfilters in Workday are used to further refine data within a related business object or a subset of data already filtered by the primary filter. They are not the primary mechanism for applying a condition to the main dataset (e.g., all workers). For this scenario, asubfilter would be unnecessary since the condition applies directly to the Worker business object, not a related object.
* B. Output: The Output section of a custom report definition controls how the report is displayed or delivered (e.g., file format, scheduling), not the data selection criteria. It does not allow for specifying conditions like hire date ranges.
* C. Columns: The Columns tab defines which fields are displayed in the report output (e.g., Worker ID, Name, Hire Date). While you can add the "Hire Date" field here for visibility, it does not control which workers are included in the report-that is the role of the Filter tab.
To implement this in practice:
* In the custom report definition, go to theFiltertab.
* Add a new filter condition.
* Select the "Hire Date" field from the Worker business object.
* Set the operator to "in the range" and define the range as "Current Date - 30 days" to "Current Date" (using dynamic date functions available in Workday).
* Save and test the report to ensure it returns only workers hired within the last 30 days.
This filtered report can then be enabled as a web service (via the Advanced tab) or used in an Enterprise Interface Builder (EIB) or Workday Studio integration to send the data to the third-party system, meeting the integration requirement.
References from Workday Pro Integrations Study Guide:
* Workday Report Writer Fundamentals: Section on "Creating and Managing Filters" explains how filters are used to limit report data based on specific conditions, such as date ranges.
* Integration System Fundamentals: Discusses how custom reports serve as data sources for integrations and the importance of filters in defining the dataset.
* Core Connectors & Document Transformation: Highlights the use of filtered custom reports in outbound integrations to third-party systems.
Question 12
What is the limitation when assigning ISUs to integration systems?
Understanding ISUs and Integration Systems in Workday
* Integration System User (ISU):An ISU is a specialized user account in Workday designed for integrations, functioning as a service account to authenticate and execute integration processes. ISUs are created using the "Create Integration System User" task and are typically configured with settings like disabling UI sessions and setting long session timeouts (e.g., 0 minutes) toprevent expiration during automated processes. ISUs are not human users but are instead programmatic accounts used for API calls, EIBs, Core Connectors, or other integration mechanisms.
* Integration Systems:In Workday, an "integration system" refers to the configuration or setup of an integration, such as an External Integration Business (EIB), Core Connector, or custom integration via web services. Integration systems are defined to handle data exchange between Workday and external systems, and they require authentication, often via an ISU, to execute tasks like data retrieval, transformation, or posting.
* Assigning ISUs to Integration Systems:ISUs are used to authenticate and authorize integration systems to interact with Workday. When configuring an integration system, you assign an ISU to provide the credentials needed for the integration to run. This assignment ensures that the integration can access Workday data and functionalities based on the security permissions granted to the ISU via its associated Integration System Security Group (ISSG).
* Limitation on Assignment:Workday's security model imposes restrictions to maintain control and auditability. Specifically, an ISU is designed to be tied to a single integration system to ensure clear accountability, prevent conflicts, and simplify security management. This limitation prevents an ISU from being reused across multiple unrelated integration systems, reducing the risk of unintended access or data leakage.
Evaluating Each Option
Let's assess each option based on Workday's integration and security practices:
Option A: An ISU can be assigned to five integration systems.
* Analysis:This is incorrect. Workday does not impose a specific numerical limit like "five" for ISU assignments to integration systems. Instead, the limitation is more restrictive: an ISU is typically assigned to only one integration system to ensure focused security and accountability. Allowing an ISU to serve multiple systems could lead to confusion, overlapping permissions, or security risks, which Workday's design avoids.
* Why It Doesn't Fit:There's no documentation or standard practice in Workday Pro Integrations suggesting a limit of five integration systems per ISU. This option is arbitrary and inconsistent with Workday's security model.
Option B: An ISU can be assigned to an unlimited number of integration systems.
* Analysis:This is incorrect. Workday's security best practices do not allow an ISU to be assigned to an unlimited number of integration systems. Allowing this would create security vulnerabilities, as an ISU' s permissions (via its ISSG) could be applied across multiple unrelated systems, potentially leading to unauthorized access or data conflicts. Workday enforces a one-to-one or tightly controlled relationship to maintain auditability and security.
* Why It Doesn't Fit:The principle of least privilege and clear accountability in Workday integrations requires limiting an ISU's scope, not allowing unlimited assignments.
Option C: An ISU can be assigned to only one integration system.
* Analysis:This is correct. In Workday, an ISU is typically assigned to a single integration system to ensure that its credentials and permissions are tightly scoped. This aligns with Workday's security model, where ISUs are created for specific integration purposes (e.g., an EIB, Core Connector, or web service integration). When configuring an integration system, you specify the ISU in the integration setup (e.g., under "Integration System Attributes" or "Authentication" settings), and it is not reused across multiple systems to prevent conflicts or unintended access. This limitation ensures traceability and security, as the ISU's actions can be audited within the context of that single integration.
* Why It Fits:Workday documentation and best practices, including training materials and community forums, emphasize that ISUs are dedicated to specific integrations. For example, when creating an EIB or Core Connector, you assign an ISU, and it is not shared across other integrations unless explicitly reconfigured, which is rare and discouraged for security reasons.
Option D: An ISU can only be assigned to an ISSG and not an integration system.
* Analysis:This is incorrect. While ISUs are indeed assigned to ISSGs to inherit security permissions (as established in Question 26), they are also assigned to integration systems toprovide authentication and authorization for executing integration tasks. The ISU's role includes both: it belongs to an ISSG for permissions and is linked to an integration system for execution. Saying it can only be assigned to an ISSG and not an integration system misrepresents Workday's design, as ISUs are explicitly configured in integration systems (e.g., EIB, Core Connector) to run processes.
* Why It Doesn't Fit:ISUs are integral to integration systems, providing credentials for API calls or data exchange. Excluding assignment to integration systems contradicts Workday's integration framework.
Final Verification
The correct answer is Option C, as Workday limits an ISU to a single integration system to ensure security, accountability, and clarity in integration operations. This aligns with the principle of least privilege, where ISUs are scoped narrowly to avoid overexposure. For example, when setting up a Core Connector: Job Postings (as in Question 25), you assign an ISU specifically for that integration, not multiple ones, unless reconfiguring for a different purpose, which is atypical.
Supporting Documentation
The reasoning is based on Workday Pro Integrations security practices, including:
* Workday Community documentation on creating and managing ISUs and integration systems.
* Tutorials on configuring EIBs, Core Connectors, and web services, which show assigning ISUs to specific integrations (e.g.,Workday Advanced Studio Tutorial).
* Integration security overviews from implementation partners (e.g., NetIQ, Microsoft Learn, Reco.ai) emphasizing one ISU per integration for security.
* Community discussions on Reddit and Workday forums reinforcing that ISUs are tied to single integrations for auditability (r/workday on Reddit).
Question 13
Refer to the following XML data source to answer the question below.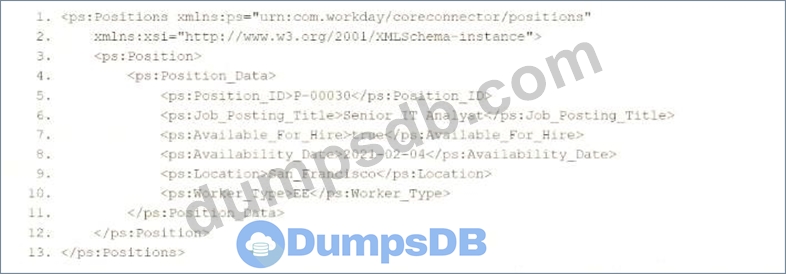
You need the integration file to format the ps:Position_ID field to 10 characters, truncate the value if it exceeds, and align everything to the left.
How will you start your template match on ps:Position to use Document Transformation (DT) to do the transformation using XTT?
Here's why option A is correct:
* Template Matching: The <xsl:template match="ps:Position"> correctly targets the ps:Position element in the XML, as shown in the provided snippet, ensuring the transformation applies to the appropriate node.
* XTT Attributes:
* xtt:fixedLength="10" specifies that the Pos_ID field should be formatted to a fixed length of 10 characters. If the ps:Position_ID value exceeds 10 characters, it will be truncated (by default, XTT truncates without raising an error unless explicitly configured otherwise), meeting the requirement to truncate if the value exceeds.
* xtt:align="left" ensures that the output is left-aligned within the 10-character field, aligning with the requirement to align everything to the left.
* XPath Selection: The <xsl:value-of select="ps:Position_Data/ps:Position_ID"/> correctly extracts the ps:Position_ID value (e.g., "P-00030") from the ps:Position_Data child element, as shown in the XML structure.
* Output Structure: The <Position><Pos_ID>...</Pos_ID></Position> structure ensures the transformed data is wrapped in meaningful tags for the target system, maintaining consistency with Workday integration practices.
Why not the other options?
* B.
xml
WrapCopy
<xsl:template xtt:align="left" match="ps:Position">
<Position>
<Pos_ID xtt:fixedLength="10">
<xsl:value-of select="ps:Position_Data/ps:Position_ID"/>
</Pos_ID>
</Position>
</xsl:template>
This applies xtt:align="left" to the xsl:template element instead of the Pos_ID element. XTT attributes like fixedLength and align must be applied directly to the element being formatted (Pos_ID), not the template itself, making this incorrect.
* C.
xml
WrapCopy
<xsl:template match="ps:Position">
<Position xtt:fixedLength="10">
<Pos_ID xtt:align="left">
<xsl:value-of select="ps:Position_Data/ps:Position_ID"/>
</Pos_ID>
</Position>
</xsl:template>
This applies xtt:fixedLength="10" to the Position element and xtt:align="left" to Pos_ID. However, XTT attributes like fixedLength and align should be applied to the specific field being formatted (Pos_ID), not the parent element (Position). This misplacement makes it incorrect.
* D.
xml
WrapCopy
<xsl:template xtt:fixedLength="10" match="ps:Position">
<Position>
<Pos_ID xtt:align="left">
<xsl:value-of select="ps:Position_Data/ps:Position_ID"/>
</Pos_ID>
</Position>
</xsl:template>
This applies xtt:fixedLength="10" to the xsl:template element and xtt:align="left" to Pos_ID. Similar to option B, XTT attributes must be applied to the specific element (Pos_ID) being formatted, not the template itself, making this incorrect.
To implement this in XSLT for a Workday integration:
* Use the template from option A to match ps:Position, apply xtt:fixedLength="10" and xtt:align="left" to the Pos_ID element, and extract the ps:Position_ID value using the correct XPath. This ensures the ps:
Position_ID (e.g., "P-00030") is formatted to 10 characters, truncated if necessary, and left-aligned, meeting the integration file requirements.
References:
* Workday Pro Integrations Study Guide: Section on "Document Transformation (DT) and XTT" - Details the use of XTT attributes like fixedLength and align for formatting data in XSLT transformations, including truncation behavior.
* Workday Core Connector and EIB Guide: Chapter on "XML Transformations" - Explains how to use XSLT templates with XTT attributes to transform position data, including fixed-length formatting and alignment.
* Workday Integration System Fundamentals: Section on "XTT in Integrations" - Covers the application of XTT attributes to specific fields in XML for integration outputs, ensuring compliance with formatting requirements like length and alignment.
Question 14
A calculated field used as a field override in a Connector is not appearing in the output. Assuming the field has a value, what could cause this to occur?
Question 15
Your manager has asked for a value on their dashboard for how many days away the birthdays are of their direct reports. The format of the output should be [Worker's Name]'s birthday is in [X] days, where you must calculate the number of days until a Worker's next birthday. An example output is "Logan McNeil's birthday is in 103 days." Which calculated field functions do you need to accomplish this?
* Date Difference:To calculate the number of days until the worker's next birthday, you need to determine the difference between the current date and the worker's birthdate in the current or next year (whichever is upcoming). The Date Difference function calculates the number of days between two dates. In this case:
* Use the worker's "Date of Birth" field (from the Worker business object).
* Adjust the year of the birthdate to the current year or next year (if the birthday has already passed this year) using additional logic.
* Calculate the difference from today's date to this adjusted birthday date. For example, if today is February 21, 2025, and Logan's birthday is June 4 (adjusted to June 4, 2025), Date Difference returns 103 days.
* Format Number:The result of Date Difference is a numeric value (e.g., 103). To ensure it displays cleanly in the output string (without decimals or unnecessary formatting), Format Number can be used to convert it to a simple integer string (e.g., "103").
* Text Constant:To build the output string, static text like "'s birthday is in " and " days" is needed. The Text Constant function provides fixed text values to include in the final concatenated result.
* Concatenate Text:The final step is to combine the worker's name (e.g., "Logan McNeil"), the static text, and the calculated days into one string. Concatenate Text merges multiple text values into a single output, such as "Logan McNeil" + "'s birthday is in " + "103" + " days".
* Option Analysis:
* A. Format Date, Increment or Decrement Date, Extract Single Instance, Format Text:
Incorrect. Format Date converts dates to strings but doesn't calculate differences. Increment or Decrement Date adjusts dates but isn't suited for finding days until a future event. Extract Single Instance is for multi-instance fields, not relevant here. Format Text adjusts text appearance, not numeric calculations.
* B. Build Date, Format Date, Extract Single Instance, Format Text: Incorrect. Build Date creates a date from components, useful for setting the next birthday, but lacks the difference calculation. Format Date and Extract Single Instance don't apply to the core need.
* C. Date Difference, Format Number, Text Constant, Concatenate Text: Correct. These functions cover calculating the days, formatting the number, adding static text, and building the final string.
* D. Increment or Decrement Date, Format Number, Text Constant, Concatenate Text:
Incorrect. Increment or Decrement Date can't directly calculate days to a future birthday without additional complexity; Date Difference is more appropriate.
* Implementation:
* UseDate Differenceto calculate days from today to the next birthday (adjusting the year dynamically with additional logic if needed).
* ApplyFormat Numberto ensure the result is a clean integer.
* UseText Constantfor static text ("'s birthday is in " and " days").
* UseConcatenate Textto combine Worker Name, static text, and the formatted number.
References from Workday Pro Integrations Study Guide:
* Workday Calculated Fields: Section on "Date Functions" explains Date Difference for calculating time spans.
* Report Writer Fundamentals: Covers Concatenate Text and Text Constant for string building in reports.
Download PDF File
Enter your email address to download Workday.Workday-Pro-Integrations.v2025-11-03.q18 Dumps